Table of Contents
Making your Bluehost WordPress site live is straightforward. It takes just a few simple steps.
Launching a website can feel overwhelming, especially for beginners. But with Bluehost and WordPress, the process is smoother than you might think. Whether you are a small business owner, a blogger, or someone wanting to showcase your portfolio, getting your site live is crucial.
This guide will walk you through each step, ensuring your site is up and running without a hitch. By following this easy-to-understand tutorial, you will have your site live in no time, ready for the world to see. So, let’s dive in and make your Bluehost WordPress site live today!
Choosing A Hosting Plan
Choosing the right hosting plan is a crucial step in making your Bluehost WordPress site live. The hosting plan you select affects your site’s performance, security, and scalability. Let’s dive into the key aspects of selecting the right plan and the pricing options available.
Selecting The Right Plan
Bluehost offers different hosting plans to suit various needs. It’s important to understand what each plan offers:
- Basic: Ideal for beginners, includes one website, 50 GB SSD storage, and standard performance.
- Plus: Suitable for small businesses, includes unlimited websites, unlimited storage, and standard performance.
- Choice Plus: Includes all Plus features with additional privacy and security options.
- Pro: Best for high-traffic sites, offers unlimited websites, unlimited storage, and high performance.
Consider your website’s current needs and future growth. If you plan to run multiple websites, the Plus or Pro plan might be better. For a single blog or portfolio, the Basic plan may suffice.
Pricing Options
Bluehost provides various pricing options to fit different budgets. Here’s a breakdown of the costs:
| Plan | Monthly Price (Starting) |
|---|---|
| Basic | $2.95 |
| Plus | $5.45 |
| Choice Plus | $5.45 |
| Pro | $13.95 |
These prices reflect discounts for new customers. Renewal prices may be higher. Always check for the latest promotions on Bluehost’s website.
To summarize, choose a plan that aligns with your site’s needs and budget. Whether starting small or aiming for high traffic, Bluehost has a plan to support your WordPress site.
Credit: www.bluehost.com
Setting Up Your Domain
Making your Bluehost WordPress site live needs you to set up a domain. Your domain name is the address users will type to find your site. This guide will help you either register a new domain or use an existing domain.
Registering A New Domain
If you don’t have a domain name, you can register a new one. Bluehost makes this easy. Follow these steps:
- Log in to your Bluehost account.
- Navigate to the Domains section.
- Click on Register a New Domain.
- Enter your desired domain name in the search box.
- Check if the domain name is available.
- If available, add it to your cart and proceed to checkout.
- Complete the purchase by following the payment instructions.
After registering, the domain will be ready to connect to your WordPress site. This process is quick and straightforward.
Using An Existing Domain
If you already have a domain, you can use it with your Bluehost WordPress site. Here’s how:
- Log in to your Bluehost account.
- Go to the Domains section.
- Click on Assign a Domain to Your cPanel Account.
- Choose the option Use a domain not registered with Bluehost.
- Enter your existing domain name.
- Verify your domain ownership by selecting one of the verification methods.
- Follow the prompts to point your domain to Bluehost’s servers. This usually involves updating your domain’s DNS settings.
After verifying, your existing domain will be linked to your Bluehost account. It may take a few hours for DNS changes to propagate. Be patient.
Setting up your domain is a crucial step in making your WordPress site live. Whether you register a new domain or use an existing one, follow these steps carefully.
Installing WordPress
Installing WordPress is a crucial step in making your site live. You have two main options: using Bluehost’s one-click install or doing it manually. Both are easy, but one-click install is faster. Let’s explore both methods.
Using Bluehost One-click Install
Bluehost offers a one-click install feature. This makes setting up WordPress simple. First, log in to your Bluehost account. Find the ‘My Sites’ section and click on ‘Create Site’.
Next, you will see a setup wizard. It will guide you through the process. You will need to enter your site name and tagline. Then, choose your domain. Click ‘Next’ to proceed.
The system will install WordPress for you. Once complete, you can log in to your new WordPress site. Use the credentials provided. It’s that easy!
Manual Installation Steps
Manual installation gives you more control. Start by downloading the latest WordPress version from WordPress.org. Save the zip file on your computer.
Next, log in to your Bluehost control panel. Go to the ‘File Manager’ and upload the zip file to your root directory. Extract the files there.
Now, create a MySQL database. Go to the ‘MySQL Databases’ section in Bluehost. Create a new database and user. Write down the database name, user, and password.
Open the WordPress folder you extracted. Find the ‘wp-config-sample.php’ file. Rename it to ‘wp-config.php’. Open this file and enter your database details.
Save the file and close it. Next, visit your domain in a web browser. You will see the WordPress setup wizard. Follow the steps to complete the installation. Enter your site details and create an admin account. Once done, you can log in to your new WordPress site.
Configuring WordPress Settings
Configuring WordPress settings is a crucial step in making your Bluehost WordPress site live. Proper settings ensure your site runs smoothly and is user-friendly. This section covers some key settings to help you get started.
General Settings
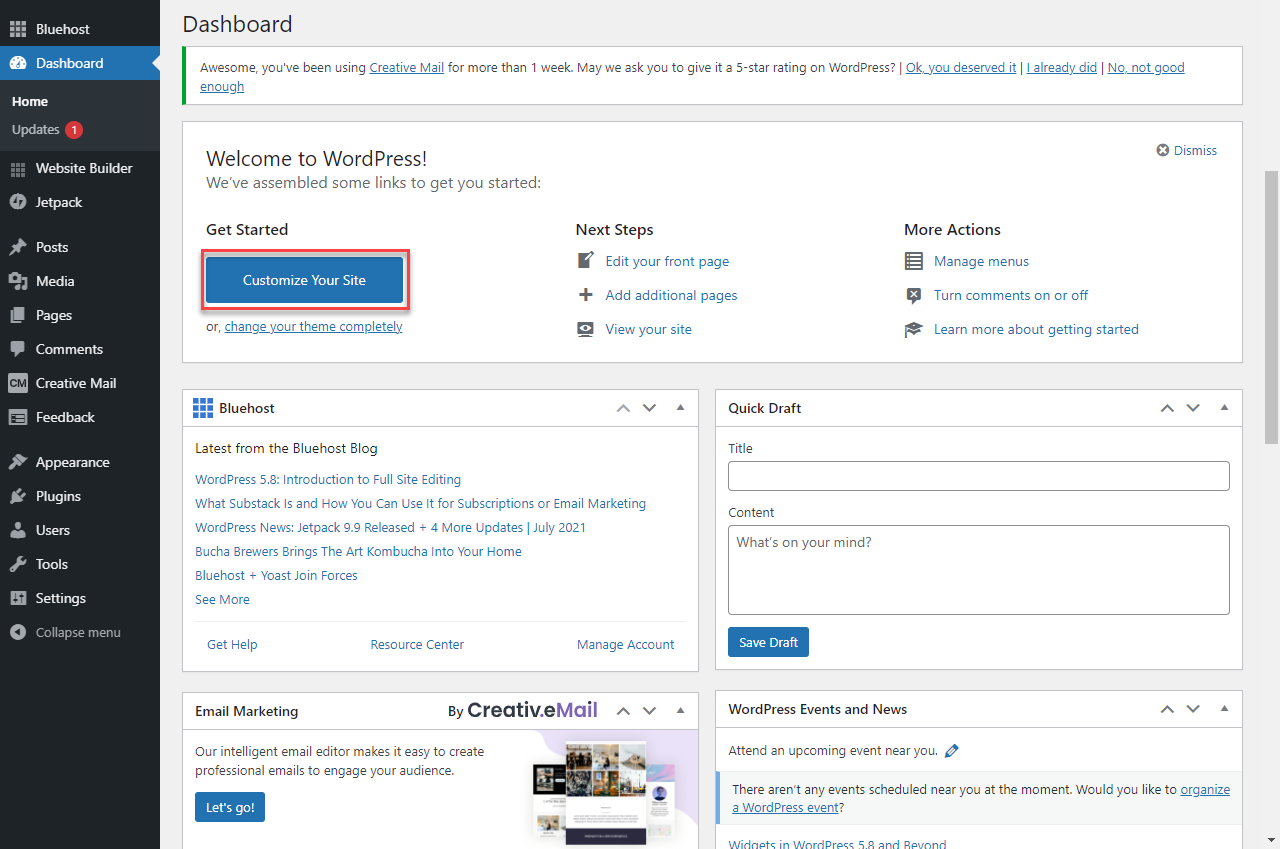
First, go to your WordPress dashboard. Click on “Settings” and then “General.” Here, you can set your site title and tagline. These should reflect your site’s purpose. Make sure to fill in your WordPress and site address URLs. They should match the domain you want your visitors to see.
Also, set the email address for admin purposes. This ensures you receive important notifications. Choose the correct timezone for your location. This affects post scheduling and timestamps. Set your preferred date and time format. This improves readability for your audience.
Permalink Structure
Next, go to “Settings” and click on “Permalinks.” This setting determines how your URLs look. The default option is often not ideal. Choose “Post name” for a clean and SEO-friendly URL structure. This helps search engines understand your content better.
Custom permalinks can also be set up if needed. They offer flexibility and control over your URL structure. Remember, once your site is live, avoid changing permalinks. It can lead to broken links and affect your SEO. Save your changes and move on to other settings.
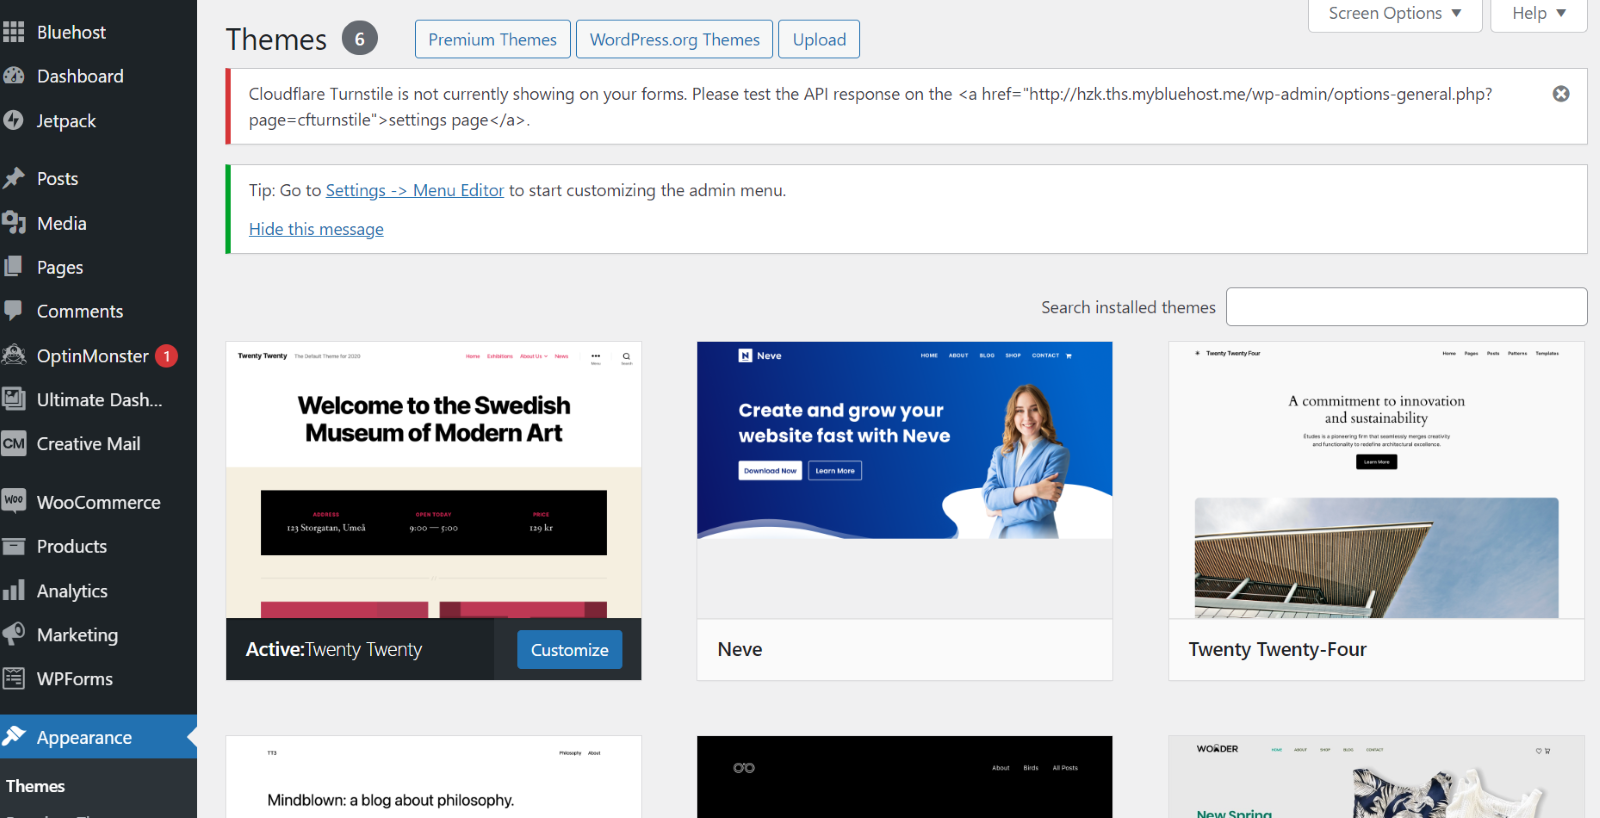
Selecting A Theme
Choosing the right theme for your Bluehost WordPress site is crucial. It affects your site’s look and functionality. A good theme can make your site look professional. It should also be easy to navigate.
WordPress offers many themes. Some are free, while others are premium. Your choice depends on your needs and budget. Let’s explore the options.
Free Vs. Premium Themes
Free themes can be a good start. They cost nothing and are easy to install. WordPress has many free themes to choose from. These themes are often simple but can still look great.
Premium themes offer more features. They usually look more professional. Premium themes often come with support and regular updates. They may cost money but offer more customization options. Choose a premium theme if you want more control over your site’s design.
Customizing Your Theme
Once you’ve chosen a theme, you can customize it. This makes your site unique. Most themes allow you to change colors and fonts. You can also add your own logo and images.
WordPress has a built-in Customizer tool. Use it to make changes and see them in real-time. This tool is user-friendly. It helps even beginners create a professional-looking site.
Spend some time exploring the options. Customizing your theme can make a big difference. It helps your site stand out and match your brand.
Installing Essential Plugins
Activate essential plugins to make your Bluehost WordPress site live. These plugins improve security, speed, and SEO for better performance.
Creating a WordPress site with Bluehost is simple. To make your site effective, install essential plugins. Plugins add features and improve functionality. They help with security, SEO, and performance. Let’s explore the must-have plugins and how to install them.
Must-have Plugins
1. Yoast SEO: This plugin improves your site’s SEO. It helps you optimize your content.
2. Akismet Anti-Spam: It protects your site from spam comments.
3. WP Super Cache: This plugin speeds up your site. It creates static HTML files.
4. Jetpack: It offers security, performance, and site management features.
5. Contact Form 7: It allows you to create contact forms easily.
How To Install Plugins?
1. Go to your WordPress dashboard.
2. Click on “Plugins” in the left menu.
3. Click “Add New” at the top.
4. Search for the plugin by name.
5. Click “Install Now” next to the desired plugin.
6. After installation, click “Activate”.
Repeat these steps for each plugin. Ensure they are active for optimal performance. Installing essential plugins improves your site’s functionality. It helps create a better experience for your visitors.
“`
Creating And Managing Content
Creating and managing content is vital for making your Bluehost WordPress site live. Quality content engages visitors and boosts your site’s SEO. Let’s explore the key aspects of content creation and management.
Writing Posts And Pages
Posts and pages are the building blocks of your site. Posts are regular updates or articles. Pages are static content, like your “About Us” page. To write a post, go to the WordPress dashboard. Click on “Posts” and then “Add New.” You can add a title and start writing. Use the formatting tools to structure your content. Add images or videos to make it engaging.
For pages, go to “Pages” and click “Add New.” Pages often include detailed information. They do not change as frequently as posts. Ensure your content is clear and helpful. Use headings and subheadings to improve readability.
Organizing With Categories And Tags
Categories and tags help organize your content. Categories are broad topics. Tags are more specific keywords. Each post can have one or more categories. You can add categories while writing a post. Look for the “Categories” box on the right side.
Tags work similarly but are more specific. They help with detailed organization. Add tags in the “Tags” box when writing a post. Both categories and tags improve navigation on your site. They also help search engines understand your content better.

Credit: www.bluehost.com
Optimizing For Seo
To make your Bluehost WordPress site successful, it must be visible. This means optimizing for search engines. SEO, or Search Engine Optimization, helps your site rank higher in search results. Higher rankings mean more visitors. More visitors can lead to more business. Below, we will explore how to optimize your site for SEO.
Using Seo Plugins
SEO plugins are tools that help you improve your site’s SEO. Two popular options are Yoast SEO and All in One SEO Pack. Both are free and easy to use.
- Yoast SEO: This plugin helps you with keywords, readability, and more. It also offers suggestions to improve your content.
- All in One SEO Pack: This plugin is great for beginners. It automatically optimizes your titles and meta tags.
Using these plugins can save you time and help you follow best practices.
Best Practices For Seo
Following SEO best practices ensures your site performs well in search engines. Here are some tips:
- Use Keywords: Research and use relevant keywords in your content. Tools like Google Keyword Planner can help.
- Optimize Images: Use alt text for images. This helps search engines understand the content.
- Create Quality Content: Write informative and engaging content. This keeps visitors on your site longer.
- Improve Page Speed: A fast-loading site improves user experience. Use tools like Google PageSpeed Insights to check.
- Use Internal Links: Link to other pages on your site. This helps search engines crawl your site.
Following these best practices can improve your site’s visibility and attract more visitors.
Launching Your Site
Once you’ve built your WordPress site with Bluehost, it’s time to share it with the world. Launching your site involves several steps to ensure everything is in place. This guide will help you check off the final tasks and make your site live.
Final Checklist
Before making your site live, go through this final checklist to ensure everything is ready:
- Content Review: Ensure all your pages and posts are complete.
- Spelling and Grammar: Check for any typos or errors.
- Images: Make sure all images are optimized and have alt text.
- Links: Verify all internal and external links work correctly.
- SEO: Optimize titles, meta descriptions, and keywords.
- Mobile-Friendly: Test your site on various devices.
- Backup: Create a backup of your site.
Making Your Site Live
To make your site live, follow these steps:
- Log in to Bluehost: Access your Bluehost account.
- Navigate to My Sites: Click on the “My Sites” tab.
- Select Your Site: Choose the site you want to make live.
- Settings: Go to the “Settings” tab.
- Launch Site: Click the “Launch” button.
Your site is now live! Test it by visiting your domain to ensure everything looks good.
Credit: www.bluehost.com
Frequently Asked Questions
How Do I Make My Bluehost WordPress Site Live?
To make your Bluehost WordPress site live, log into your Bluehost account. Navigate to your WordPress dashboard. Click on “Launch” under the Bluehost menu. Follow the prompts to publish your site.
What Settings To Check Before Going Live?
Before going live, check your site’s permalinks, SEO settings, and privacy settings. Ensure your content is optimized. Verify all plugins and themes are up-to-date.
How Long Does It Take To Go Live?
Typically, your Bluehost WordPress site goes live instantly. However, DNS changes might take up to 48 hours to propagate.
Can I Preview My Site Before It Goes Live?
Yes, you can preview your site using the “Preview” option in the WordPress dashboard. Ensure everything looks correct before launching.
Conclusion
Making your Bluehost WordPress site live is straightforward. Follow the steps discussed. Your site will be accessible to visitors quickly. Ensure you check all settings before going live. Regularly update your content for the best performance. A well-maintained site attracts more visitors.
Keep learning and improving your skills. This will help you manage your site better. Happy blogging!