Creating a WordPress website with Hostinger is simple and straightforward. In just a few steps, you can have a professional website up and running.
Table of Contents
Starting a website might seem daunting, but with Hostinger and WordPress, it’s easier than you think. WordPress is a popular platform for building websites due to its flexibility and user-friendly interface. Hostinger, on the other hand, offers reliable and affordable hosting services.
Together, they make an excellent combination for beginners and experts alike. In this guide, we will walk you through the process. By the end, you’ll have a functional and attractive WordPress site. Whether you are setting up a blog, business site, or online store, this guide will help you get started quickly and efficiently.
Choosing Hostinger Plan
Choosing the right Hostinger plan is crucial for your WordPress website’s success. Hostinger offers various options tailored to different needs. Let’s explore the key aspects to help you make an informed decision.
Shared Vs. Cloud Hosting
Shared Hosting is an economical option, ideal for beginners. Your website shares server resources with others. This keeps costs low but may impact performance during high traffic periods.
Cloud Hosting offers higher performance and reliability. Your site operates on multiple servers, ensuring better uptime and faster load times. It’s suitable for growing websites with higher traffic.
Pricing And Features
Hostinger provides various plans with distinct features and pricing. Here’s a comparative table to simplify your choice:
| Feature | Shared Hosting | Cloud Hosting |
|---|---|---|
| Starting Price | $1.99/month | $9.99/month |
| Storage | 30GB to 200GB | 100GB to 300GB |
| Bandwidth | 100GB to Unlimited | Unlimited |
| Free Domain | Included with premium plans | Included |
| Daily Backups | Available on higher plans | Included |
Both hosting types offer a 30-day money-back guarantee. Consider your website’s requirements before choosing a plan. For small personal blogs, shared hosting is cost-effective. For e-commerce sites or higher traffic blogs, cloud hosting is more suitable.
Registering A Domain
Registering a domain is the first step to making your WordPress website with Hostinger. Your domain is your website’s address on the internet. It needs to be unique and easy to remember.
Selecting A Domain Name
Choose a domain name that reflects your website’s purpose. It should be simple and easy to spell. Avoid using numbers and hyphens. Keep it short, ideally under 15 characters.
Use keywords that describe your content. This helps search engines find your site. Make sure the name is easy to pronounce. If users can say it, they can remember it.
Completing Domain Registration
Once you select a name, check its availability. Hostinger provides a domain search tool for this.
Enter your desired domain name into the search bar. Hostinger will show if it is available. If taken, you will see alternative suggestions.
After finding an available name, proceed to register it. Fill in your personal and payment information. Ensure your details are accurate and up-to-date.
Complete the purchase and confirm your email address. Your domain is now registered and ready to use with your WordPress site on Hostinger.
Setting Up Hostinger Account
Setting up your Hostinger account is the first step to creating your WordPress website. Hostinger offers an easy and user-friendly interface to get you started quickly. This guide will walk you through the process of creating an account and navigating the Hostinger dashboard.
Creating An Account
To create your Hostinger account, follow these steps:
- Visit the Hostinger website.
- Click the Sign Up button at the top right corner.
- Fill in your email address and create a strong password.
- Click Create Account.
You can also sign up using your Google or Facebook account. This makes the process quicker and easier.
Navigating The Dashboard
Once your account is created, you will be taken to the Hostinger dashboard. Here is what you will see:
| Section | Description |
|---|---|
| Home | Overview of your account and services. |
| Hosting | Manage your hosting plans and domains. |
| Set up and manage your email accounts. | |
| Billing | View and manage your invoices and payments. |
| Support | Access customer support and knowledge base. |
Each section is designed to help you manage different aspects of your website efficiently. Spend a few minutes familiarizing yourself with the dashboard. This will make the setup process smoother.
Once you are comfortable, you can proceed to set up your WordPress website. The dashboard is intuitive, making it easy for even beginners to navigate.
Credit: www.hostinger.com
Installing WordPress
Installing WordPress on your website is an essential step. Hostinger makes this process simple and straightforward. There are two main methods to install WordPress: using the one-click install feature or doing it manually. Let’s explore both methods to help you get started quickly.
One-click Install
Hostinger offers a one-click install option that is perfect for beginners. This method saves time and avoids technical complications. Follow these steps:
- Log in to your Hostinger account.
- Navigate to the hPanel dashboard.
- Click on the Website tab.
- Select Auto Installer from the dropdown menu.
- Choose WordPress from the list of applications.
- Fill in the required details, such as admin username and password.
- Click Install and wait for the process to complete.
This method is quick and ensures a smooth setup. Your WordPress website will be ready in minutes.
Manual Installation
If you prefer more control, you can opt for a manual installation. This method involves downloading WordPress and uploading it to your server. Follow these steps:
- Download the latest version of WordPress.
- Unzip the downloaded file on your computer.
- Log in to your Hostinger hPanel.
- Go to the File Manager under the Files section.
- Upload the unzipped WordPress files to the public_html directory.
- Create a new MySQL database and user in the Databases section.
- Open your domain in a web browser to start the WordPress installation wizard.
- Enter the database details you created earlier.
- Complete the setup by filling in the site information and admin details.
This method gives you more flexibility. It’s ideal for those who are comfortable with a bit of technical work.
Both methods are effective for installing WordPress with Hostinger. Choose the one that fits your comfort level and technical expertise.
Configuring WordPress Settings
Configuring WordPress settings is a crucial step in building your website. It ensures your site runs smoothly and meets your needs. This section will guide you through the essential settings in WordPress.
General Settings
Start with the General Settings. Go to your WordPress dashboard. Click on “Settings” and then “General”. Here, you can set your site title and tagline. Make sure they reflect your site’s purpose.
Next, check your WordPress and site address (URL). These should match your domain name. Also, set your email address. This email is where you will receive notifications.
Choose your time zone, date format, and time format. This keeps your site’s timings accurate. Finally, select your preferred language for the site. Save your changes before moving on.
Permalink Structure
Permalinks are the URLs for your posts and pages. Go to “Settings” and click “Permalinks”. Choose a structure that is SEO-friendly. The “Post name” option is a popular choice. It makes your URLs clean and easy to read.
A good permalink structure helps search engines understand your content. It also improves user experience. After selecting your structure, click “Save Changes”.
These settings are important for your WordPress site. They make your site user-friendly and search engine friendly. Take your time to configure them properly.
Choosing A Theme
Choosing a theme is a crucial step in building your WordPress website with Hostinger. The right theme defines your site’s look and feel. It can impact user experience and your site’s performance. Let’s dive into some key aspects to consider.
Free Vs. Premium Themes
WordPress offers both free and premium themes. Each has its benefits. Free themes are great for beginners and small projects. They are budget-friendly and easy to use. Some popular free themes are Astra and OceanWP.
Premium themes offer more features and customization options. They often come with support and regular updates. This is useful for more complex websites. Divi and Avada are examples of popular premium themes.
Here is a quick comparison:
| Free Themes | Premium Themes | |
|---|---|---|
| Cost | Free | Paid |
| Support | Limited | Comprehensive |
| Updates | Occasional | Regular |
| Features | Basic | Advanced |
Installing And Activating Themes
Installing a theme in WordPress is simple. Follow these steps:
- Go to your WordPress dashboard.
- Navigate to Appearance and then Themes.
- Click on the Add New button.
- Use the search bar to find a theme.
- Click Install and then Activate.
For premium themes, you might need to upload the theme file. Follow these steps:
- Purchase and download the theme file from a trusted source.
- Go to Appearance and then Themes.
- Click Add New and then Upload Theme.
- Choose the downloaded file and click Install Now.
- Once uploaded, click Activate.
By choosing the right theme and installing it correctly, you set a strong foundation for your website.
Installing Essential Plugins
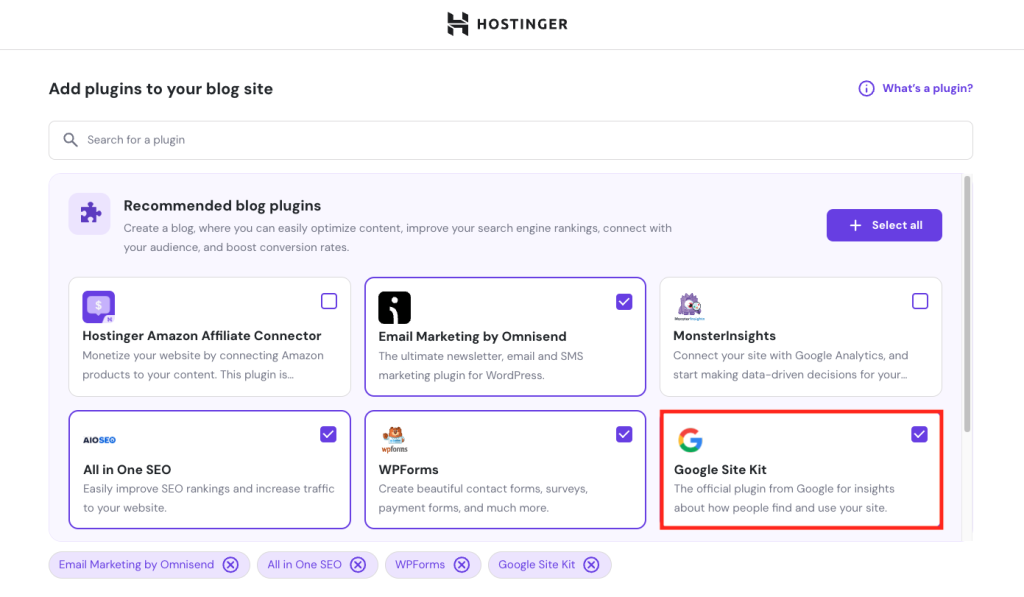
Once your WordPress website is up and running on Hostinger, the next crucial step is installing essential plugins. Plugins add vital features to your website, boosting its performance, security, and SEO. Let’s dive into some must-have plugins to get started.
Seo Plugins
SEO plugins help improve your website’s visibility on search engines. This is key for attracting more visitors.
- Yoast SEO: This plugin is user-friendly and helps optimize your content. It provides real-time feedback on readability and keyword usage.
- All in One SEO Pack: A versatile plugin that offers advanced features for both beginners and experts. It automatically generates meta tags and optimizes titles for better rankings.
- Rank Math: An all-in-one SEO plugin that simplifies complex tasks. It offers suggestions for internal linking, rich snippets, and more.
Security Plugins
Security is paramount for any website. Security plugins protect your site from threats and vulnerabilities.
- Wordfence: This plugin provides a comprehensive security solution. It includes a firewall, malware scanner, and security alerts.
- Sucuri: Sucuri offers a suite of security tools. These include malware scanning, blacklist monitoring, and a web application firewall.
- iThemes Security: Known for its ease of use, iThemes Security offers over 30 ways to secure your site. It protects against brute force attacks and enhances login security.
Incorporate these essential plugins into your WordPress site to improve its functionality and security. Your website will be well-protected and optimized for search engines, ensuring a better user experience.

Credit: www.hostinger.com
Creating Content
Creating content is the heart of your WordPress website. It keeps visitors engaged and coming back. With Hostinger, you can easily create and manage different types of content. Let’s explore how to add pages and write blog posts.
Adding Pages
Pages are essential for your website. They hold static content like About, Contact, and Services pages. Here’s how to add a new page:
- Log in to your WordPress dashboard.
- Navigate to Pages on the sidebar.
- Click Add New.
- Enter your page title and content.
- Click Publish to make it live.
Use the WordPress editor to style your content. Add headings, images, and links to make it engaging. You can also use page builders for advanced layouts.
Writing Blog Posts
Blog posts are dynamic and keep your audience updated. They are perfect for sharing news, tips, and stories. Follow these steps to write a blog post:
- Go to your WordPress dashboard.
- Click on Posts in the sidebar.
- Select Add New.
- Enter your post title and start writing.
- Add categories and tags to organize your content.
- Click Publish when you’re ready.
Use short paragraphs and bullet points to make posts easy to read. Include images and videos to make your content more engaging. Always proofread before publishing.
Customizing Your Site
Customizing your site is a crucial step in making your WordPress website truly yours. With Hostinger, you have all the tools at your disposal to make your site unique. This guide will help you understand how to use widgets, menus, and custom CSS to personalize your website.
Widgets And Menus
Widgets add extra features to your WordPress site. You can add widgets to your site’s sidebar, footer, or other widget-ready areas. To add a widget, go to the WordPress dashboard. Select Appearance, then Widgets. Drag and drop the widget you want to the desired area. You can add calendars, search bars, and more.
Menus help visitors navigate your site. To create a menu, go to Appearance, then Menus. Click Create a new menu. Add pages, posts, or links to the menu. Arrange them in the order you want. Save the menu and assign it to a location on your site.
Custom Css
Custom CSS allows you to make changes to your site’s appearance. You can change colors, fonts, and layout styles. To add custom CSS, go to the WordPress dashboard. Select Appearance, then Customize. Click on Additional CSS. Enter your custom CSS code in the box provided. Changes will be visible in the preview. Once satisfied, click Publish to apply the changes.
With custom CSS, you have full control over your site’s design. Make small tweaks or major changes. The choice is yours.
Credit: www.youtube.com
Launching Your Website
You’ve built your WordPress site with Hostinger. Now, it’s time to launch. This guide will help you ensure everything is perfect before going live.
Final Checks
Before launching, perform some final checks. These will ensure your site works smoothly.
- Check for broken links: Ensure all links work correctly.
- Test site speed: Use tools like GTmetrix or Google PageSpeed Insights.
- Review content: Proofread all text and ensure it is clear.
- Verify images: Ensure images are optimized and load quickly.
- Test forms: Submit forms to ensure they work.
Going Live
Once final checks are done, you can go live.
- Update DNS settings: Point your domain to Hostinger’s servers.
- Enable SSL: Secure your site with an SSL certificate.
- Backup your site: Create a backup before making the site public.
- Announce your launch: Inform your audience through email or social media.
Your site is now live. Enjoy your new online presence!
Frequently Asked Questions:
What Is Hostinger?
Hostinger is a web hosting provider. It offers affordable hosting plans. It’s ideal for beginners and experts alike.
How To Install WordPress On Hostinger?
Log into Hostinger. Go to the “Website” section. Click “Auto Installer. ” Select WordPress. Follow the on-screen instructions.
Is Hostinger Good For WordPress?
Yes, Hostinger is great for WordPress. It offers fast loading times. It’s user-friendly and affordable.
How To Secure My WordPress Site On Hostinger?
Use strong passwords. Install security plugins. Enable SSL. Regularly update WordPress and plugins. Backup your site often.
Conclusion
Creating a WordPress website with Hostinger is simple and efficient. Follow the steps to get your site live quickly. Choose a hosting plan, install WordPress, and customize. Use the tools provided by Hostinger to enhance your site. Remember, practice makes perfect.
Keep updating and improving your website. With Hostinger, you have reliable support to help you. Start today and watch your website grow. Happy building!